|
|
|
版权声明
首先,该软件并不完善,中间因需求打断了。所以只写了删除操作,其他操作还没有添加,看明白的朋友有空可以添加。
一:程序截图:
(1) 输入字母和数字,以点阵形式显示,有光标。
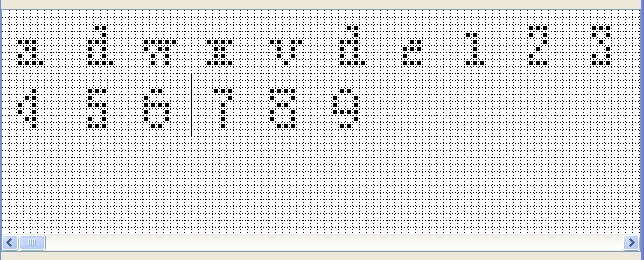
(2) 移动光标,删除其中的字(现在只能删除,其他操作没有写,程序中已经提供了API)

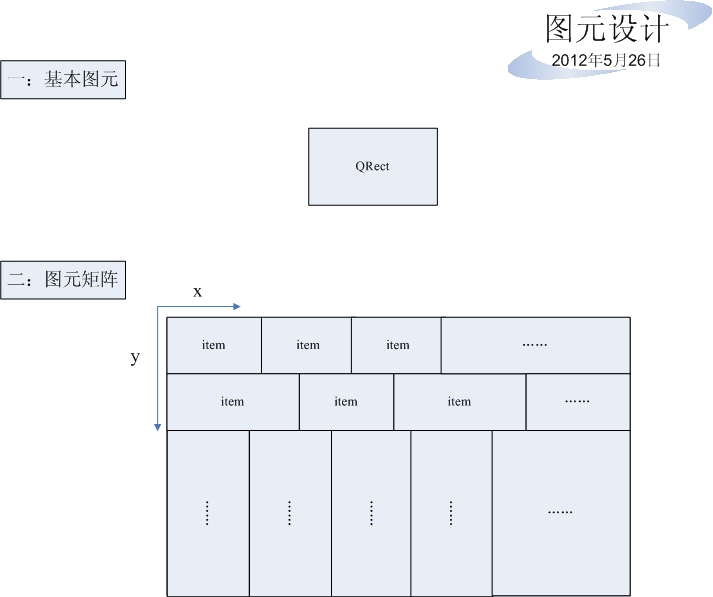
二:软件分析:
(1) 架构分析

(2)图元分析
(三)代码概略
(1)逻辑层:一些重要的数据结构- //矩阵方位数据结构
- QPoint m_MatrixPoint; //x 为行号,y为列号 从0行0列开始
- //! 控制全局所有图元的区域
- QList < QList<QRect> >m_Matrix;
- //! 记录光标所有的位置,主要是为了根据当前光标返回所在的行号和列号
- QList < QList<QPoint> > m_cursorMatrix;
- //! 记录该图元是否是可以改变,x:行号 y:列号
- QList < QPoint > m_changeAreaList;
-
- QRect m_deleteArea; //删除区域,根据当前光标找到前一个位置,然后返回该区域
- QRect m_insertArea; //插入区域:根据当前光标进行插入的区域,和m_rowEndArea共用
- QRect m_EnterArea; //换行区域:每次都到下一行的起始断,并且修改矩阵,和m_rowListArea共用
- QRect m_rowEndArea; //当前行某一列到该行行末的区域
- QRect m_rowListArea; //换行前,下一行到末尾所有的区域
- QList<QRect> m_rowAreaList;
(2)数据层:比较简单,就是实际画布- void DataImage::setImage(QImage dataImage)
- {
- this->m_dataImage = dataImage;
- this->update();
- }
(3)背景层: 代码里是视图层,但逻辑上我把它分成背景,主要是画光标和网格
- /*! ******************************************
- * 视图层:从数据image获取数据后,根据其像素点分别画在视图上
- *******************************************/
- /*!
- * 画面大小
- */
- void EditScene::initSize(QGraphicsView *view, int iWidth, int iHeight )
- {
- this->initColor();
- this->m_iCustXCnt = iWidth;
- this->m_iCustYCnt = iHeight;
- this->m_dataImage = QImage( iWidth, iHeight , QImage::Format_Mono );
- this->m_dataImage.fill( m_backColor.rgb() );
- this->m_iSize = view->size().height()/this->m_iCustYCnt;
- // view->setGeometry( view->geometry().x(), view->geometry().y(),
- // WIDTH, HEIGHT*m_iSize +SPACE);
- this->setSceneRect(0, 0, iWidth*m_iSize, iHeight*m_iSize);
- qDebug() << m_iCustXCnt*m_iSize<< m_iCustYCnt*m_iSize <<__FILE__<<__LINE__;
- m_backImage = QImage( m_iCustXCnt*m_iSize, m_iCustYCnt*m_iSize, QImage::Format_Mono );
- m_backImage.fill( m_backColor.rgb() );
- }
- /*!
- * 初始化颜色
- */
- void EditScene::initColor()
- {
- m_backLineColor = Qt::darkYellow; //网格颜色
- m_pointColor = Qt::black; //画圆
- m_backColor = Qt::white; //背景白色
- }
- /*!
- * 画网格
- */
- void EditScene::setGrid(bool enable)
- {
- qDebug() << m_iSize << m_iCustXCnt<< m_iCustYCnt <<this->height()<< this->width()
- <<m_iCustXCnt*m_iSize<<m_iCustYCnt*m_iSize<<__FILE__<<__LINE__;
- QPainter painter( &m_backImage );
- if ( enable ) {
- QPen pen(this->m_backLineColor, 0); //虚线的颜色
- pen.setStyle( Qt::DotLine); //虚线的类型
- painter.setPen( pen );
- for( int i = 1; i < this->m_iCustXCnt; ++i ) {
- int x = m_iSize*i;
- painter.drawLine( x, 0, x, this->height() );
- }
- for ( int j = 1; j < this->m_iCustYCnt; ++j ) {
- int y = m_iSize*j;
- painter.drawLine(0, y, this->width(), y );
- }
- }
- m_backImage.save("/home/lbs/1.bmp");
- this->setBackgroundBrush( this->m_backImage );
- }
(4)视图层:根据像素画点
- /*!
- *判断是否画点
- */
- bool EditScene::isDrawPoint( int icustx,int icusty )
- {
- //int gray = DataImage.pixel( QPoint(icustx,icusty) );
- int gray = qGray( this->m_dataImage.pixel(QPoint(icustx,icusty)) );
- if( gray == 0 ){
- return true;
- }else{
- return false;
- }
- }
- /*!
- * 清除某点
- */
- void EditScene::ClearPoint( int icustx, int icusty )
- {
- QPainter painter( &m_backImage );
- painter.setPen( QPen( Qt::transparent, 0 ) );
- painter.setBrush( QBrush( m_backColor, Qt::SolidPattern ) );
- painter.drawRect( icustx*m_iSize+1, icusty*m_iSize+1 , m_iSize-2, m_iSize-2 );
- this->setBackgroundBrush( m_backImage );
- ClearDataImagePoint( icustx, icusty );
- }
- /*!
- * 清除数据图像上的某点
- */
- void EditScene::ClearDataImagePoint( int icustx ,int icusty )
- {
- this->m_dataImage.setPixel( icustx, icusty , 1 );
- }
(5)动作事件:接受键盘动作- /*! ******************************************
- * 事件层:接收命令,下发动作
- *******************************************/
- void EditScene::keyPressEvent(QKeyEvent *event)
- {
- switch( event->key() ) {
- //操作
- case Qt::Key_Up:
- emit this->sendCursorMove( Location::Up);
- break;
- 。。。。。。。。。
- }
- /*!
- * 插入操作
- */
- void EditScene::insertOpeSlot()
- {
- emit
- this->sendCursorMove( Location::Insert );
- }
- /*!
- *
- 根据按键输入不一样的字符
- */
- void EditScene::setKeyText(QString minStr,
- QString maxStr)
- {
- QString sendStr;
- if (
- this->m_capsEnabel ) {
- //! 大写数据
- sendStr = maxStr;
- }else {
- //! 小写数据
- sendStr = minStr;
- }
-
- emit this->sendText( sendStr );
- }
- /*!
- * 重绘
-
- */
- void EditScene::Redraw(QRect sourceArea ,QPoint newTopLeft)
- {
- qDebug() <<sourceArea<<
- newTopLeft<<__FILE__<<__LINE__;
- QImage m_oldImage =
- m_dataImage.copy( sourceArea );
- this->cleanRect( sourceArea );
- m_cursorTopLeft = newTopLeft;
- //画点
- if(
- !m_oldImage.isNull() ){
- for( int i = 0; i <
- m_oldImage.height(); ++i ){
- for ( int j = 0; j <
- m_oldImage.width(); ++j ){
- int gray = qGray(
- m_oldImage.pixel( QPoint(j,i) ) );
- if( gray == 0 ){
- //! 要加入 光标的位置 m_cursorTopLeft
-
- DrawPoint( m_cursorTopLeft.x()+ j,m_cursorTopLeft.y()+ i );
-
- }
- }
- }
- }
-
- this->m_displayerImage->setImage( this->m_dataImage);
- }
- /*!
- * 加载镜像,并提出灰度,并画点
- */
- void EditScene::LoadPointByImage( QImage *
- img )
- {
- if( !img->isNull() ){
- for( int i = 0; i
- < img->height(); ++i ){
- for ( int j = 0; j <
- img->width(); ++j ){
- int gray = qGray(
- img->pixel( QPoint(j,i) ) );
- if( gray == 0 ){
-
- //! 要加入 光标的位置 m_cursorTopLeft
-
- DrawPoint( m_cursorTopLeft.x()+ j,m_cursorTopLeft.y()+ i );
-
- }
- }
- }
- }
-
- this->m_displayerImage->setImage( this->m_dataImage);
-
- //移动光标
- emit this->sendNewUnit();
- emit
- this->sendCursorMove( Location::Right);
- }
- /*!
- *
- 获取清除区域范围
- */
- void EditScene::cleanRect(QRect rect)
- {
-
- //移动光标
- // emit this->sendCursorMove( Location::Left);
- //
- QSize cleanSize = rect.size();
- // QImage cleanImage =
- this->m_dataImage.scaled(
- cleanSize,Qt::KeepAspectRatio,Qt::FastTransformation);
-
- m_cleanTopLeft = rect.topLeft();
- qDebug() << rect.topLeft()
- <<__FILE__<<__LINE__;
- this->cleanPointByImage(
- &m_dataImage.copy( rect ) );
- }
- /*!
- * 清除区域内所有点
- */
- void EditScene::cleanPointByImage(QImage *img)
- {
-
- if( !img->isNull() ){
- for( int i = 0; i <
- img->height(); ++i ){
- for ( int j = 0; j <
- img->width(); ++j ){
- int gray = qGray(
- img->pixel( QPoint(j,i) ) );
- if( gray == 0 ){
-
- //! 要加入 光标的位置 m_cursorTopLeft
-
- this->ClearPoint(j+m_cleanTopLeft.x(),i+ m_cleanTopLeft.y());
- }
- }
- }
- }
-
- this->m_displayerImage->setImage( this->m_dataImage);
- }
代码下载请到下面地址:
|
本帖子中包含更多资源
您需要 登录 才可以下载或查看,没有帐号?立即注册
x
|


